
Sky-Watcher AZ-GTi Mount
I have been shooting with the Sky-Watcher AZ-GTi for close to two years now and thought it was about time to share my experience with it in the hopes it may benefit others. This is my own independent review of the mount, I have no affiliation with SkyWatcher or any of it’s retailers. I paid full price and purchased it to use, and not simply to produce content. My reason for buying this mount was that I was previously using the star adventurer which was working well, but I shoot a bortle 9 zone and I have to image over many nights to make a good picture, so I was starting to feel like it was time for a go I got frustrated enough that I caved one night, so I looked for the absolute cheapest and smallest go-to capable mount I could find and here we are!
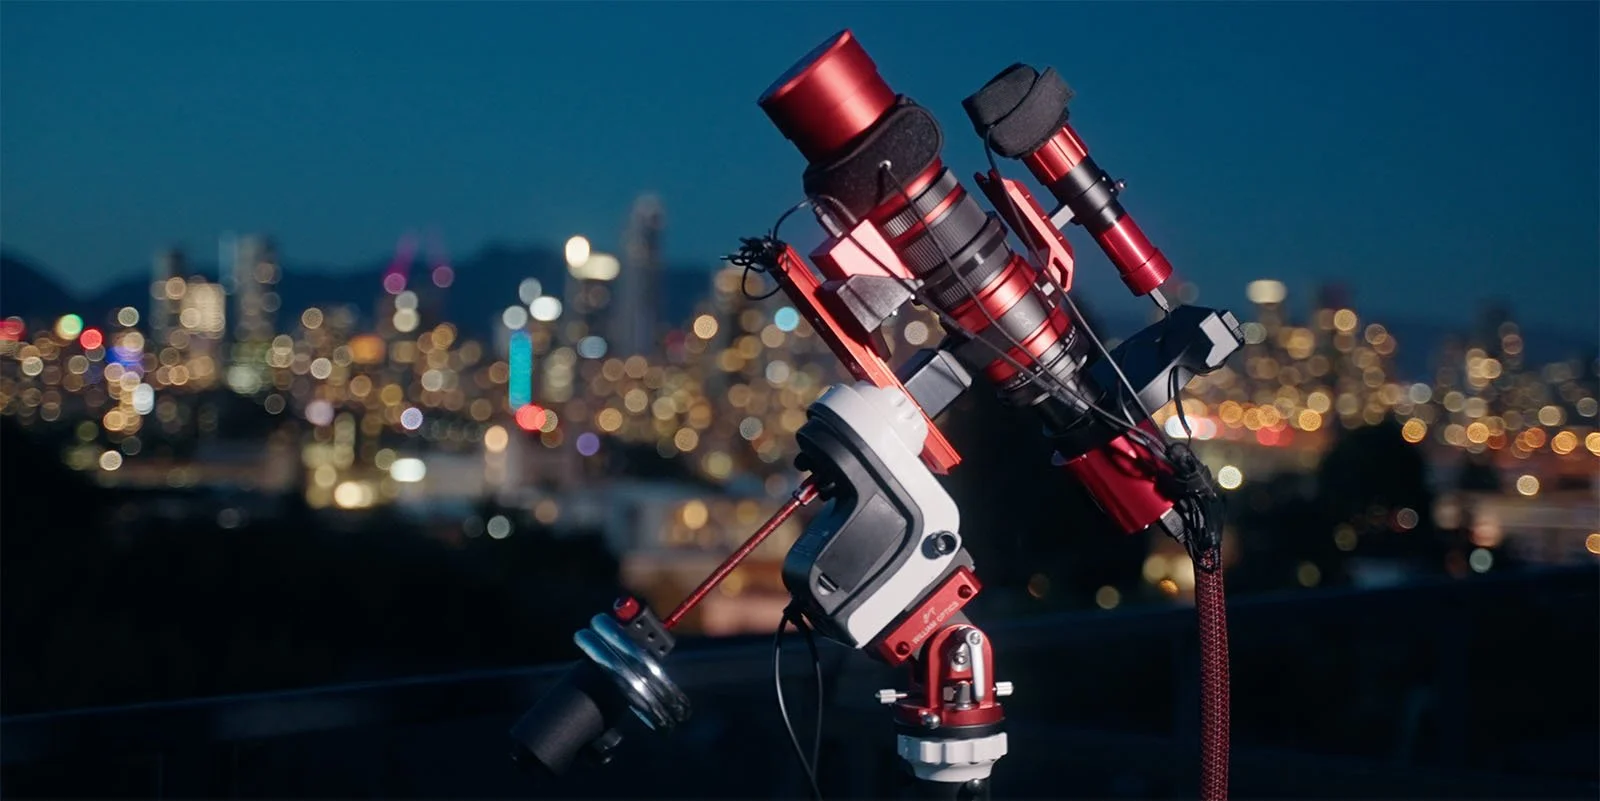
The Sky-Watcher AZ-GTi is an alt azimuth mount originally intended for visual observing and perhaps a little lunar or planetary photography, but SkyWatcher released a firmware update which opens up this mount to being used in equatorial mode, and therefore for astrophotography. I have never used this mount for visual astronomy or in alt-az mode, not even once, but never say never right? This mount is extremely light and compact with the mount head weighing in at 2.6 pounds, and the included tripod weighs 7.9 pounds, so barely over 10 lbs combined. It can run off DC power or AA batteries. The mount features wifi connectivity for pairing with the synscan app on your smartphone or tablet, you can connect a hand controller, or use an eq mod cable to pair with your computer or something like the ASIAIR Pro. Of course all this connectivity allows for one of it’s main features, which is an extremely accurate goto feature so you can find your favourite targets with a simple tap on your screen and away you go. That same EQ mod cable for use with your computer will also allow the mount to be used with auto guiding for much longer exposures. This little mighty mount can support a max payload of 11 pounds but I have seen people go quite a bit over that and still get great performance, so of course your mileage may vary. At $475 US dollars This is the smallest, lightest and most affordable eq mount that you are going to find on the market. I have invented a new category for this mount instead of grab and go, I’m calling it grab and go-to. Normally you would only see this size, price and weight in a star tracker, not an equatorial mount. I must mention that SkyWatcher has recently produced the Star Adventurer GTi, which we will discuss later on in this review.
Let’s talk about how we get this little bad boy running in EQ mode for astrophotography. The first thing you’re going to need is completely invisible, a firmware update. I am running version 3.20 which is an older version, I did upgrade it and had auto guiding issues as did others, so I downgraded and it solved the issue, so 3.20 will get the job done, but the latest version has been reported to work well also. You can find the AZ-GTi firmware page here. Next you will need a wedge. If you already have something like a star adventurer you could use the wedge from that, in my case I upgraded to the William Optics High Latitude wedge, it is a worthy investment and makes polar alignment much smoother and it is remarkably easier to make precise fine adjustments during that process. If your budget allows I would highly recommend this upgrade for your star trackers and the AZ-GTi, it makes a big difference in comparison to the stock SkyWatcher version.


Next we will need a counterweight and bar. Again, if you have the star adventurer bundle you can use that rod and weight, but the threading is different and thus requires an adapter. You’ll need an M8 to M12 adapter as the GTi has female M12 threads, also double check that your AZ-GTi actually is threaded as some have shipped without any threads inside the mount. In my case I had a spare counterweight kit from the star adventurer so I ordered the thread adapter, but they sent the wrong one and I couldn’t find the right one quickly enough, so I went to home depot and bought a large bolt, some nuts and a few washers and I dropped that through the mount and went DIY. There is a also a dedicated M12 counterweight bar is being offered online, I have recently purchased and installed it and it is perfect. You can find it online here. You’ll still need a counterweight, but they are plentiful online and you can just grab the Sky-Watcher version from Amazon.
Alright, we have our firmware and our counterweight is setup, now we only need to connect the mount to our imaging controller of choice. In my case here, I am using the ZWO ASIAIR Pro, and I am making this connection with An EQ Mod Cable. I got mine from First Light Optics and it works perfectly. That is all we have to do to convert this mount from Alt-AZ to Equatorial. From here the process is the same for shooting astrophotos as it is with any mount.
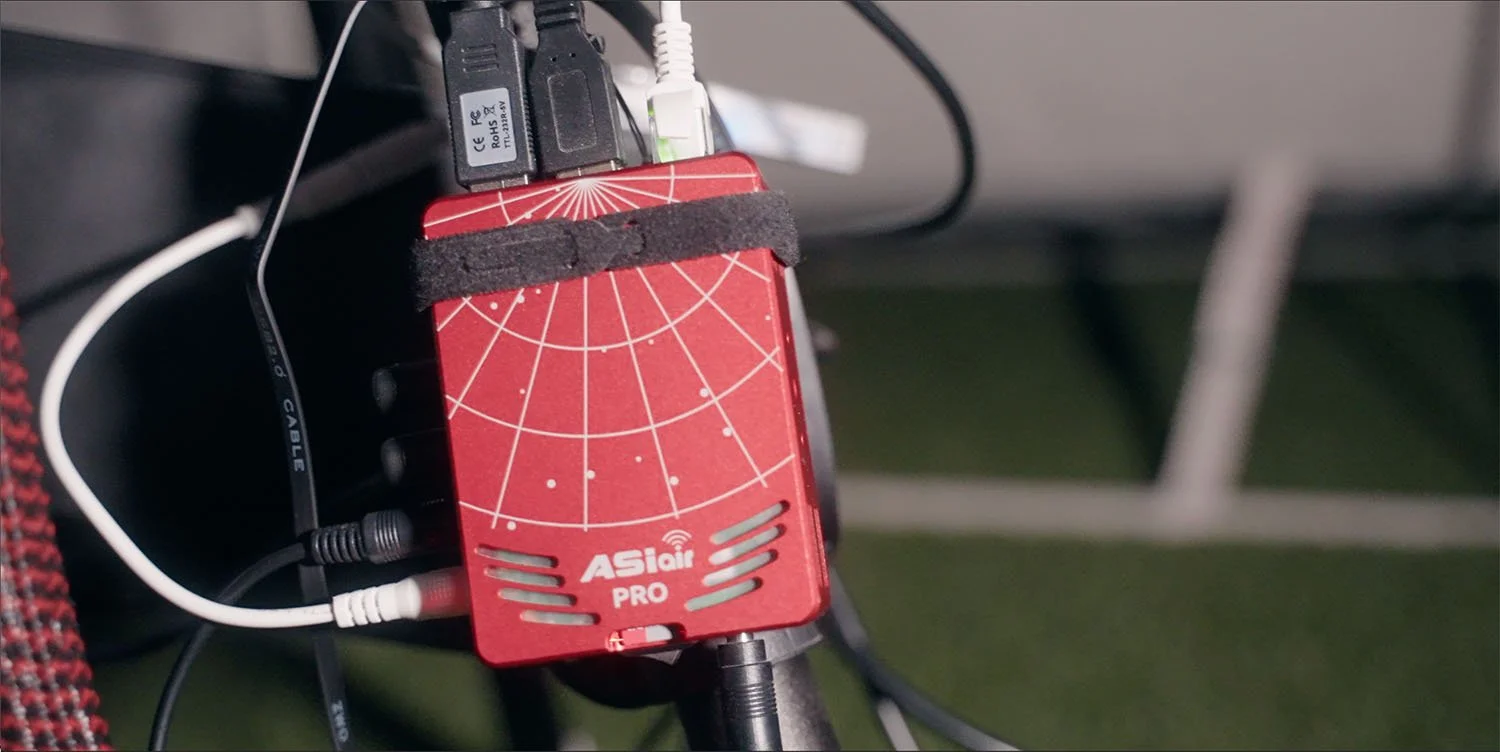
A fully loaded ZWO ASIAIR Pro driving the AZ-GTi mount.
I don’t use the synscan app that pairs with this mount, I only run it off the ASIAir, which I also use to perform my polar alignments and go-tos. This mount is easy to align in this manner despite not having any form of polar finder or scope in its design. The go-tos or pointing are extremely accurate and meridian flips are trouble free. Everything has been all roses and candy so far in this review, so we are going discuss our challenges with this mount now. Autoguiding is where we will face our main problem. When you run calibration steps for this mount you will notice that on the RA axis everything goes perfectly smooth, but when you get to the Declination steps the mount has a lot of trouble stepping back to the original position, there is a gargantuan amount of backlash on this axis. I know many people have taken their’s apart in an attempt to improve this, but I am not confident that I would improve things much if I were to do that myself. Despite the backlash I get excellent guiding with this mount when conditions are favourable, meaning when there is low wind and the seeing is half decent. My total RMS error falls between 0.7 and 1.4 on average. I have seen it lower, and higher. Anything under 2 arc seconds on my setup gives me round stars on a 300 second guided exposure, so as long as it’s not too windy it gets the job done just fine. I can’t go any longer than that without issues, I’ve tried 7 and 10 minutes and never had it work, but sticking with 5 minutes gets me consistently good results.
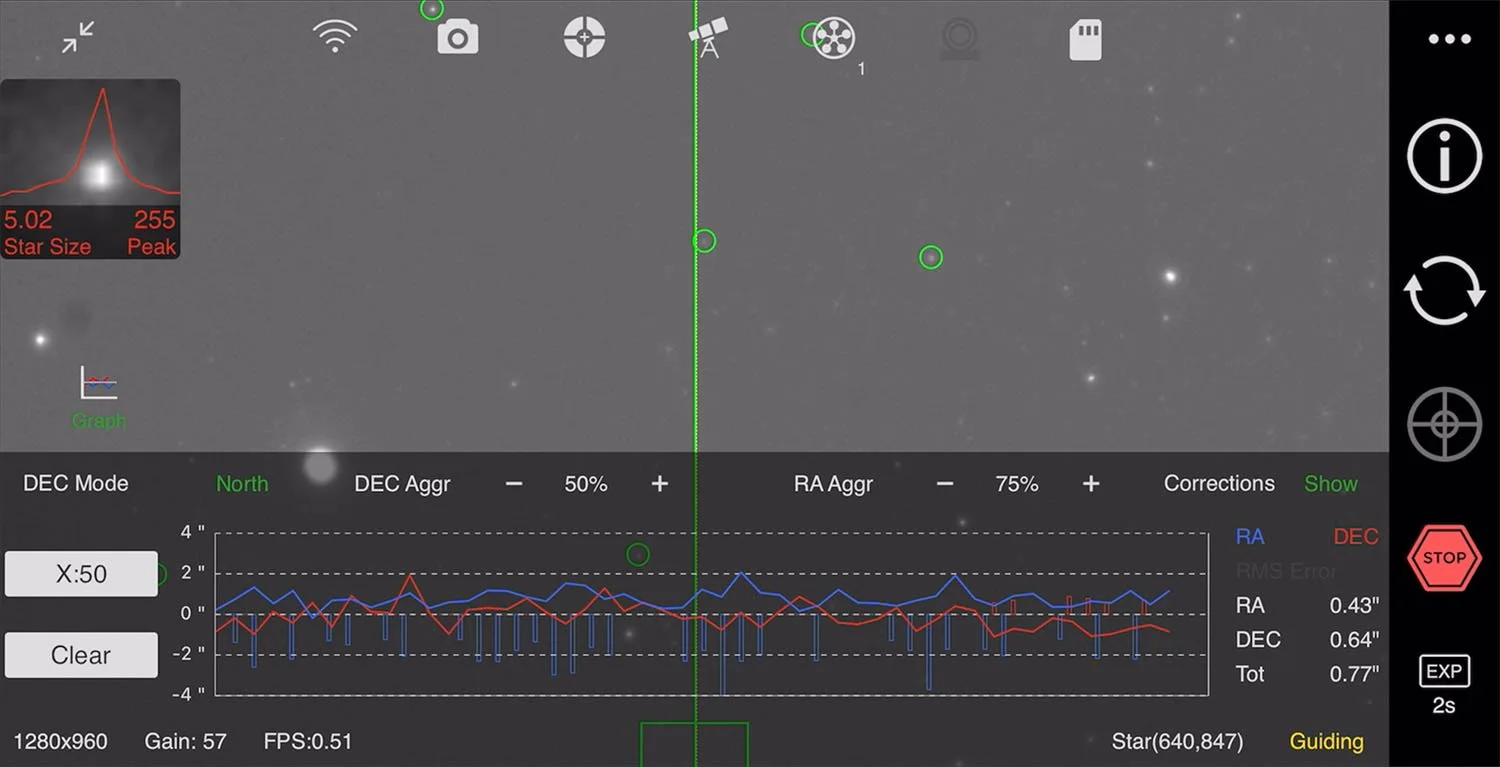
My scope is 250mm focal length and my camera has a 1 inch sensor, so this would be the equivalent of 675mm on a full frame sensor. With longer focal lengths than this, you would probably have to shorten up the exposure time, with a wider focal length setup you could probably go longer. My last comment on the operation of this mount when guiding is that many times it doesn’t guide well after calibration, it goes way off with a very high RMS. In these cases I just hit stop, and I restart guiding, I don’t recalibrate. Just stop and start the guiding and it gets right back on track. I have had a couple nights where guiding has been erratic and frustrating, but I think that is common for any mount and they have only been one or two nights over a couple years of imaging with this mount, but I did have one of those nights on my last session and it makes me really think it may be time to upgrade.
So final thoughts, is this mount worth it. It is a lot harder to say in 2022 because we have seen the release of the Star Adventurer GTi, a fusion between the Star Adventurer and this AZ-GTi. It is more expensive, but it is purpose built for astrophotography and doesn’t require all this modification, accessories, and workarounds. If it were on the market when I was buying I would have bought that instead, I think it is the better option, that is of course if you can actually get your hands on one. If you already have a AZ-GTi or maybe you see one for sale on the used market it could be a great value proposition given it’s price. Same goes if you need a affordable and portable mount today, as the SA GTi won’t be readily available for quite a while due to back orders and supply chain issues. My recommendation is to just go with the Star Adventurer GTi if you can wait for one, I think it is the more reliable option. If you can afford it, you could look at a strain wave or harmonic mount, they are just as portable, they can handle way heavier payloads and do not require balancing or counterweights, and guiding is more accurate, but their price puts them in a completely different category than a grab and go to equatorial like the GTIs. I have a ZWO AM5 harmonic mount on order and am looking forward to that upgrade when it arrives sometime in the fall.
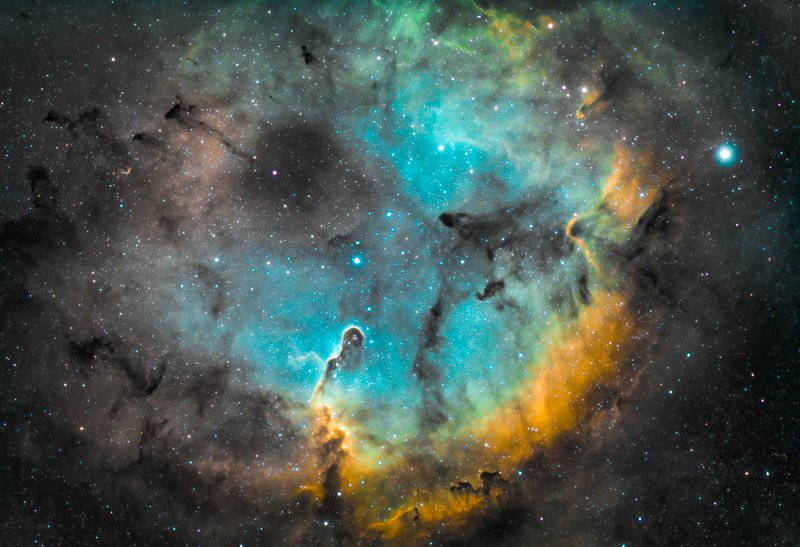
Let’s take a look at my mounts first light image. The elephant trunk nebula Is a mix of interstellar gas and dust in the area of IC1396. You can find it 2400 light years from earth in the constellation Cepheus. Astronomers believe the central cavity has been carved out by the formation of new stars and the resulting winds and pressures that are a byproduct of that process. The trunk itself in a mix of gas and dust located in front of this cavity which gives it the dramatic contrast you see here. This is the result of stacking 5 minute exposures shot on a monochromatic cooled astronomy camera through 7nm narrowband filters over 6 nights in September for a grand total of 23 hours of exposure.
That is one of my favourite targets to shoot, I just got some 3nm filters and I’m shooting it again now with a different composition to compare them, so look out for that video coming very soon. That’s going to do it for this episode of Robservatory. The stars belong to everyone, so get out there and C for yourself. Clear skies.